Lately, oat-sesame crackers and whole-wheat biscuits have become staples of my diet, so that I'm making crackers once a week and biscuits twice a week. Best snack foods ever.
I wanted to speed up the time it took for me to make them. I thought about doing the measuring to make a large mix, except that's a lot of math calculations, especially to know how much to measure out for each batch (so that I know how much of the wet ingredients to use). (Yes, I know I can do it, but it was really complex.)
Finally I decided to do it the easy way. I got out a large ziploc bag, and all the dry ingredients I put into the biscuit-bowl also went into the plastic bag. (1 cup of flour in the bowl, 1 cup in the bag. 1 tablespoon of baking powder in the bowl, 1 tablespoon in the bag, and so forth.) Now the plastic bag has all the dry ingredients measured into it, and it's easy to mix. Close the bag (but leave some air in it) and shake vigorously. I made up the biscuit mix in the bowl and put the bag in the pantry.
Today I want more biscuits. All I have to do is take my plastic bag, put contents into a bowl, add margarine and milk/lemon juice, and I have biscuit dough.
And once I get the electric skillet (in which kamut is cooking) off my counter-space, I can actually roll out the biscuits. Then I can put away the rolling pin and get out the oven...
Some things don't change.
Showing posts with label Grains. Show all posts
Showing posts with label Grains. Show all posts
Saturday, October 9, 2010
Monday, October 4, 2010
Crockpot Mac & Cheese (with real cheese)
I don't have a picture for this one. I assembled it yesterday morning, let it cook during church, and by the time the potluck was over, the mac and cheese was gone. Which is why I'm posting the recipe.
It's from a healthy cookbook, but they made this recipe healthy by using fat-free cheese. I refuse to use fat-free cheese. What on earth is it made out of, anyway? My guess is that it tastes like cardboard. However, I was able to lighten this recipe in other ways. I lessened the amount of cheese and doubled the amount of pasta (the original wanted 4 cups of cheese for 1/2 pound pasta, which is insane).
My mom tells me that macaroni and cheese has to have at least some Velveeta in it to make it creamy. I think Velveeta is really gross (and she does too, even if she does use a tiny bit). I was glad this recipe didn't call for any, because I didn't want to pay way too much money for just a tiny amount of it. (Yes, I know they sell slices of it. I also know that one package of slices costs the same as a 2-pound block, and even if it does keep for eight weeks--ick!--how on earth would I use the rest of it?)
Here's a helpful hint. When testing to see if pasta is done, use a slotted spoon. Dip out a couple pieces of pasta, bring the spoon to the sink, and run cold water on the pasta before you taste them. I am so glad I can do this now that I have a slotted spoon! I've been looking at thrift stores for a slotted spoon with no luck (nothing that looked decent enough to buy), but I saw a good one in the $1 bin at Walgreens the other day, and I was delighted to have it. On Saturday night, after I cooked the pasta, I accidentally dropped a fork on my toe, tines down (ouch!), and I remember thinking, "Well, at least I have a slotted spoon."
By the way, why on earth do manufacturers keep making plastic cooking utensils with metal on the handle? They're always in the really-cheap bin, because the metal will burn your hand if you use it near the stove. I learned my lesson five years ago, but apparently the manufacturers haven't learned theirs yet. You would think they'd have figured it out by now...
Crockpot Mac & Cheese (with real cheese)
adapted from the Fix-It and Forget-It Lightly cookbook
1 pound of elbow macaroni (or other small shapes), cooked al dente
1 can fat-free evaporated milk
1 cup skim milk
2 eggs, slightly beaten
3 cups grated extra-sharp cheddar cheese
1/4 t. salt
1/8 t. pepper
1/4 cup grated parmesan cheese
1. Spray slow cooker with cooking spray (do not omit this step).
2. In the slow cooker, mix together everything except the parmesan cheese and 1/2 cup of the cheddar cheese.
3. Top with parmesan cheese and 1/2 cup cheddar cheese.
4. Cook on low 3 hours.
Wednesday, September 22, 2010
Pasta with Walnut Oil and Leeks
I bought walnut oil last week. From what I've read, it's not good for cooking on the stove, but it's good for dressings and for baking. On Monday I decided to use it for pasta salad, and while I was grocery shopping at Wal-Mart, I decided what would be in the pasta salad. Here is my invented-at-Wal-Mart recipe.
As always, it was attended with some mishaps. I bought enough food to fill my tiny dorm fridge to bursting: two half-gallons of milk (a gallon jug won't fit) and two feet of celery, among other things. There was no room for the leeks in my fridge, unless I cooked them first. So I chopped them, cooked them, and then discovered that leeks, once cooked, are highly perishable and only last a couple of days. Oops. I decided to freeze half the leeks (it's not best for flavor/texture, but it's better than losing them completely), and the other half I kept separate from the rest of the ingredients. If you expect leftovers, as I did, mix the salad on your plate so your leftovers aren't spoiled by leeks gone bad. (That sounds ominous, doesn't it?)
Pasta with Walnut Oil and Leeks

I don't have exact quantities, because I only cooked up enough pasta for a few days' worth and mixed only one serving (see above explanation.) Adjust based on how many people you're serving. This dish has enough protein to be a main dish.
1/2 box (6 oz) high-protein pasta (rotini are good for pasta salads, because they catch the sauce in their spirals)
Walnut oil (no more than 1 tablespoon per serving)
3-5 oz. grated Parmesan cheese
1 leek per serving
1. Wash the leeks well under cold running water (they're usually pretty dirty inside). Cut off the bottom (the root end) and discard. Chop the leeks in thin slices. Make sure you don't see any dirt in the slices. If you do see dirt in the slices, take the outer layer off, rinse the rest, and keep chopping. You may need to wash the entire leek again after you've started chopping it, because the dirt gets into all the crevices. Only cut the white and very light green parts of the leek. Discard the rest.
2. Put a bit of oil into a frying pan and saute the chopped leeks over medium heat for about 5 minutes, until they look wilted. Separate the rings as you're sauteeing.
3. Add some water (a little less than one tablespoon per leek), cover the pan, and turn the heat down to simmer. Simmer for 5 minutes or until the water is evaporated and the leeks look duly cooked.
4. Cook high-protein pasta according to directions on box.
The rotini looked really funny in my electric skillet, so here's a picture:
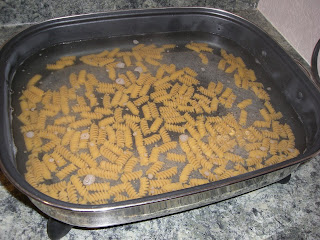
5. Drain pasta and put in bowl. Toss with walnut oil. Add leeks and plenty of parmesan cheese. Salt and pepper to taste.

Note: This is even better with truffle oil, but since truffle oil is rather expensive, walnut oil will do just fine.
Thursday, September 2, 2010
Tabouli, anyone?

I'm not sure how many batches of tabouli I've made this summer. Five or six, maybe? I've used more than 2 pounds of bulgur wheat and made plenty of trips to raid my neighbor's mint plant, and my poor parsley plant (which is still alive!) gets frequent haircuts. I don't know why I've been wanting so much tabouli, but I can't get enough of it.
If you want to try making tabouli, this is the time to do it. Pretty soon, tomatoes and cucumbers and parsley and mint will go out of season, which means paying more $$$ for lower-quality produce. Unless you live in the Southern Hemisphere, of course...
I made another trip to the store where I get my whole grains, and I got oat flour, kamut (which I'm excited to try), lots of oats, and vital wheat gluten (the easy way to make seitan). More recipes coming soon!
Tuesday, August 3, 2010
Baked Barley Pudding
After I had dinner last night, I started in on this recipe. I came across it because a cookbook that someone had given me included a recipe for a dessert with barley in it. I didn't like the particular recipe, but I was intrigued by the possibility of a dessert with barley. I did some google searches, and eventually I settled on this recipe from Taste of Home.
The recipe I used was for a very rich rice pudding, but with barley instead. I lightened it quite a bit, though. I love rice pudding, and I've experimented in the past with lighter versions of it, so I have an idea of how that works. Besides, dessert with protein is a good idea when you're eating vegetarian. (The More-with-Less cookbook has a lot to say about how desserts can have nutritional value.)
I must have been crazy to start another recipe when my kitchen looked like this:

but I did it anyway. I don't usually wash dishes as I go, because I don't have a drying rack; I lay them on the counter to dry them. And when I'm cooking, I don't have any counter space to spare, so the dishes wait.
The recipe said to bake it in 8 ramekins, but I don't have that many, so this is what I managed to scare up:

They almost look pathetic, don't they?
Meanwhile, I cooked the barley in the water and added the milk after 10 minutes, as per directions. It said to bring to a boil and simmer uncovered, and I think I turned the heat down too low, or my stove may have overheated and turned off (it does that from time to time), or maybe I should have covered it. Of course, the problem with covering it is that the water can't evaporate. Anyway, I was way over the amount of time the recipe said to cook the barley, and I still wasn't sure if it was "almost tender." How do you know if something is almost tender?

Finally I decided it had cooked enough and I took it off the stove and stirred in the half-and-half, sugar, eggs, and vanilla. It called for 1/2 cup of sugar, but that seemed like a lot as I was pouring it in, so I didn't use the entire 1/2 cup. It was still way too much sugar.
Now it's time to put away the stove and get out the oven. First I had to clear off this whole counterspace:

I got the oven preheating, and pretty soon I put the 9 x 9 pan in the oven. There was no room for the smaller pan and its ramekin, so it had to wait for the next batch.

I was most of the way through the cooking time when I realized I had forgotten to add the cinnamon and the golden raisins. Oops. At least there was still one unbaked ramekin, so I gave it some raisins and cinnamon.
After about 35 minutes, the two little ramekins were done, and the second big one went in. I also rotated the pan, because things in the back of the oven burn easily. I belatedly added the cinnamon to the top of the two little ramekins, and I tried to drop a few raisins through the hole(s) created when I stuck the knife in to see if it was done.

I gave the ramekins a few minutes to cool before I took a spoon and attacked one of them. It was liquidy, which I expected since it had just come out of the oven. It had way too much sugar (I got a sugar-headache), and the barley was really chewy. Live and learn.
For the next half-hour, I kept checking the big ramekins every 7 minutes. I think I dropped at least two knives on the floor. I was getting tired and frustrated. Finally the big ramekins were ready. If you look closely, you can see a raisin on the skin on top of the left one, from when I tried to add the raisins after it came out of the oven.

I was so glad when they were done, and I was even happier when they were cool enough to put in the fridge. I managed to eat both of the little ones, since I didn't have a place for them in the fridge. I probably could have put them under the freezer, but things put there tend to freeze (ever tried to cook with half-frozen eggs?) and I was afraid the glass might break.
Today I did dishes. Lots and lots and lots of dishes. Then I really, really cleaned the kitchen sink, because it needed it.
I had some more of the barley pudding this afternoon. When I went to bed last night, I was contemplating throwing it in the trash, but I decided it wasn't that bad and I didn't want to waste it. It actually tasted a lot better today, though it's still too sugary.
In light of all I learned, here is my modified version of the recipe. I may actually try it again, but not at the end of a long day of cooking.
Baked Barley Pudding
1-1/4 cups water
1/2 cup uncooked medium pearl barley
1/4 teaspoon salt
2 cups milk
1 cup half-and-half (may use 1/4 cup skim milk and 3/4 cup half-and-half)
1/3 cup sugar (or less)
2 eggs
1 teaspoon vanilla extract
1/2 cup golden raisins
1/4 teaspoon ground cinnamon
The directions are copied straight from their website. Make sure you cook the barley long enough, and don't forget to add the raisins and cinnamon...
Directions
In a large saucepan, bring water to a boil. Stir in barley and salt. Reduce heat; simmer, uncovered, for 15 minutes, stirring occasionally. Add milk; cook over medium-low heat for 10 minutes or until barley is almost tender, stirring frequently. In a bowl, whisk the cream, sugar, eggs and vanilla; gradually stir into the barley mixture.
Spoon into eight greased 6-oz. custard cups. Sprinkle with raisins and cinnamon. Place custard cups in two 9-in. square baking pans. Fill both pans with boiling water to a depth of 1 in. Bake, uncovered, at 350° for 30-35 minutes or until a knife inserted near the center comes out clean. Store in the refrigerator. Yield: 8 servings.
Monday, August 2, 2010
Nutty Quinoa Salad and Seitan Cutlets
I got quinoa last week, mainly because it was a complete protein, and I've been wondering what to do with it. Last night I looked it up in The New Basics Cookbook, which is a fantastic cookbook that I think everyone should have. It describes all the vegetables, grains, types of rice, etc, and how to cook them and what they're best used for. Anyway, it had a recipe for Nutty Quinoa Salad, and it looked good, so I decided to try it.
When I opened the quinoa, it smelled a little strange, so I decided it would be a good idea to rinse it--except that it was too small and would go through the holes in my colander. So I lined a bowl with a clean dishrag, put in the quinoa, then the water, and then lifted the quinoa out using the dishcloth. Rinse and repeat.


Then you cook the quinoa and water, add the raisins, and cook a bit more until the water's absorbed. My stove is a bit finicky about coming to a boil if the saucepan is big--after all, it's only a 6-inch burner--but it did pretty well. It took a little longer than the recipe, but that's normal. Then it looks like this:

It said to remove from the heat and spread it in a thin layer on a baking sheet to cool. I completely disregarded this instruction, because I didn't want to have to wash the baking sheet, and I had nowhere to put the baking sheet anyway. So I put it in a bowl and added the green onions (so they would cook a little with the steam). Pretty soon I learned why they want you to spread it out: otherwise, it sticks together in a big glob. That's okay by me. After all, it's The Modest Kitchen.
I started in on the Seitan Cutlets, which I made like the Chicken Cutlets Mom used to make. I was a little dubious about the lump of seitan I was using, because it had been in the fridge a few days, but I tried a little bit and it tasted all right, so I kept going. I sliced the seitan:
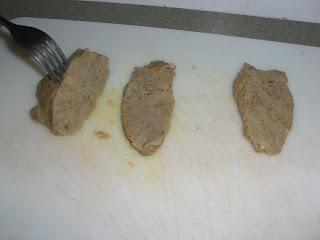
Then I dipped the slices in egg and bread crumbs and sauteed them in the pan.


When I was done, I didn't want to waste the egg, and it hadn't been contaminated by raw chicken or anything, so I scrambled the leftover egg with some of the leftover breadcrumbs.

Back to the quinoa salad. I added the peanuts, mandarin oranges, and some toasted sesame oil. The recipe calls for regular sesame oil, but it wasn't available at either of the nearby grocery stores, except an extra-virgin sesame oil (???) that cost more than $8. I was planning to add some canola oil if I needed a little more oil, but I don't like oily food, and a couple of tablespoons of toasted sesame oil seemed like plenty.

Then I sat down for dinner, and I soon realized that I hadn't added the mint or the orange zest. I was too hungry to go back to food prep, so I just added a little mint and orange zest to the portion on my plate. The quinoa salad was good--it really tasted gourmet. Unfortunately, most of the seitan had gone bad. A couple of the slices tasted ok, but most of them tasted like chewy fish. Ick. The egg, however, was fantastic. I have to do that again sometime.
After dinner, I added the mint and orange zest to the rest of the salad. Here's the final version:

Nutty Quinoa Salad
from The New Basics Cookbook
1 cup quinoa
2 cups water
1/2 cup golden raisins
1/4 cup sesame oil (I used a tablespoon or two of toasted sesame oil)
3 green onions, white bulb and 3 inches green, sliced
1/2 cup unsalted roasted peanuts
1/2 cup canned mandarin orange sections, drained (I used an entire small can, because I didn't want to waste the leftovers)
2 tablespoons chopped fresh mint leaves (I used much less, probably 10-15 leaves)
2 teaspoons grated orange zest
1. Combine the quinoa and water in a large saucepan and bring to a boil. Reduce the heat, cover, and simmer for 10 minutes. Then add the raisins and continue cooking until all the liquid has evaporated, 5 minutes. Remove the pan from the heat and spread the mixture out on a baking sheet. Let it cool completely.
2. In a large bowl, combine the quinoa and raisins with all the remaining ingredients. Toss gently and serve.
4 to 6 portions
Seitan Cutlets
Egg(s)
Italian style bread crumbs
Sliced seitan
Oil
Put egg and breadcrumbs in separate bowls. Beat egg. Dip slices of seitan in egg and then breadcrumbs to coat.
I think this would have been good, if I hadn't used too-old seitan, and if I hadn't cooked the seitan too long when I first made it (see previous post about seitan). I'll chalk that up to experience and try again, because this really is promising.
Scrambled Egg(s) with Breadcrumbs
Scramble egg(s) as usual, but add Italian-style breadcrumbs when you add the egg. Yum.
Wednesday, July 28, 2010
More Grains

I stocked up on grains and legumes today. From left to right: soy nuts, quinoa, adzuki beans; barley, bulgur, kasha (buckwheat groats).
Subscribe to:
Posts (Atom)