Thursday, September 30, 2010
Whole Wheat Biscuits
I think I ate five of these today. I hope not. I hope it was only four. At least they were small. My biscuit cutter is only 2" in diameter. I have a larger one, but I'd rather use the smaller one, so that if I eat five of them, I won't have done too much damage.
Can you tell I love biscuits? Maybe that means I'm a Southern girl at heart, except that I don't like the really rich and buttery biscuits. It's overkill. I'd rather spread the butter on top than have oodles of it already baked into the biscuit. My default biscuit is the HeartSmart Bisquick mix, but it's all white flour and no fiber. Whole-wheat foods (and high-fiber grains) are really calming to my stomach, and since my stomach's been jumpy lately, I've been eating everything whole-wheat that I can get my hands on.
The first time I made these, I thought they were so-so, but now I can't get enough of them. They're a little chewier than regular biscuits, but that's to be expected with anything whole-wheat, and they still have that wonderful biscuit flavor. They taste delightful with just a little bit of that Earth Balance margarine spread on top...
I adapted the recipe a little from this site. You can find a nutritional analysis there, too.
Whole Wheat Biscuits
1 cup all-purpose flour (yes, there's some white flour, to keep the biscuits from being too dense)
1 cup whole-wheat flour
1/2 tsp. baking soda
1 Tbsp. baking powder (yes, 1 tablespoon)
1/4 tsp. salt
Oat bran or wheat bran (optional--I like oat bran in biscuits because you can't see or taste it, and it adds fiber. It doesn't affect the actual baking, so there's no need to use a precise quantity)
3 Tbsp. stick margarine
2/3 cup skim milk mixed with 2 tsp. lemon juice (unless you just happen to have non-fat buttermilk in the house, in which case you should use 2/3 cup of that instead)
1. Thoroughly mix the dry ingredients (flours, baking soda, baking powder, salt, and bran) in a bowl.
2. Cut the margarine into the dry ingredients. Use a pastry blender if you have one; otherwise, use some cutlery. The standard method is with two knives, but I prefer to use a knife and a fork.
3. Add the milk/lemon juice mixture (or the buttermilk) and stir well. Pretty soon it will be too doughy to stir; when this happens, turn it out onto a floured workspace, add the bits of dough still left in the bowl, and knead until it's well-mixed.
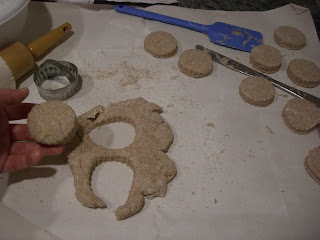
4. Roll it out with a rolling pin. It stretches back (like puff pastry, which I found to be a nightmare), but with a combination of pressing and rolling you can get it rolled out to about 1/2" thick. Cut out your biscuits with a biscuit cutter (or an improvised biscuit cutter) dipped in flour. Put them on a cookie sheet lined with parchment paper (or a non-stick cookie sheet, but then you have to wash it).
5. Get out the oven (unless you're fortunate enough to have a built-in oven) and preheat it to 325 degrees. Bake for 12-15 minutes. It's hard to tell when they're done, but if you're unsure, err on the safe side. You can always put them back in, but you can't "undo" those last few minutes of cooking time. (Wouldn't that be nice?)
Makes 16-18 small biscuits. For larger biscuits, the recipe says it'll make 8. These biscuits don't keep that long (only a couple of days). I generally freeze half of them and store the other half on the counter. When the counter biscuits are gone, I get out the frozen ones. Of course, if you devour them all the day you make them, it doesn't really matter, does it?
Wednesday, September 29, 2010
Pasta à la Rose
As I was heading out to Wal-Mart on Monday, I suddenly remembered a flavor of a certain dish, sort of like you remember a phrase from a song and suddenly you have to find out what song it comes from. So I was trying to remember what recipe this flavor came from, and it turns out it's from one of the first recipes I ever created, about ten years ago.
When I was growing up, sometimes my mom would make a chicken recipe that she got from a friend named Marge. We called it "Chicken à la Marge." I called this dish Pasta à la Rose. I'd forgotten all about it, but I made it again on Monday night and it tasted just as good as I remembered.
Pasta à la Rose
8 oz. (1/2 lb.) tiny pasta
1/2 large onion, minced or grated
2 oz. extra-sharp cheddar cheese, grated
1 egg
1. Saute onion in a bit of oil on medium to medium-high heat until onion is lightly browned and smells sweet.
2. Cook pasta according to package directions. When pasta is done, drain pasta but do not rinse.
3. Immediately put steaming-hot pasta into a large bowl. Break egg into pasta and add cheese. Stir a lot. The heat from the pasta should cook the egg and melt the cheese. Add onion and stir some more. Serve hot. Serves 4.
Option: If you want more onion flavor, serve it topped with dried minced onion (found in the spice section).
As a sidenote, many cheese-sauce dishes are really unhealthy, but there's an easy way to make them healthier. Most of these dishes have you make way too much sauce for the amount of pasta/potatoes/vegetables they call for. Double the amount of pasta/potatoes/vegetables, but keep the amount of cheese sauce the same. It'll still give you the flavor without all the extra calories. Also, always use extra-sharp cheese to give you lots of flavor with a smaller amount of cheese.
Thursday, September 23, 2010
Alien Baker, Part II
My safety goggles came today! I tried them on and they fit wonderfully. Last week I asked for a recommendation at this site, and I bought from them the pair they recommended. They definitely got it right. I think my eyes are cheering.
Meanwhile, I went to a local hardware store yesterday to return the pair of safety goggles I bought there. I told the woman at the counter that the goggles were obviously made to fit a man's face, and as I don't have one of those, I couldn't wear them. A man in line behind me just smiled and shook his head. I suppose it was a pretty comical scene...
Wednesday, September 22, 2010
Pasta with Walnut Oil and Leeks
I bought walnut oil last week. From what I've read, it's not good for cooking on the stove, but it's good for dressings and for baking. On Monday I decided to use it for pasta salad, and while I was grocery shopping at Wal-Mart, I decided what would be in the pasta salad. Here is my invented-at-Wal-Mart recipe.
As always, it was attended with some mishaps. I bought enough food to fill my tiny dorm fridge to bursting: two half-gallons of milk (a gallon jug won't fit) and two feet of celery, among other things. There was no room for the leeks in my fridge, unless I cooked them first. So I chopped them, cooked them, and then discovered that leeks, once cooked, are highly perishable and only last a couple of days. Oops. I decided to freeze half the leeks (it's not best for flavor/texture, but it's better than losing them completely), and the other half I kept separate from the rest of the ingredients. If you expect leftovers, as I did, mix the salad on your plate so your leftovers aren't spoiled by leeks gone bad. (That sounds ominous, doesn't it?)
Pasta with Walnut Oil and Leeks
I don't have exact quantities, because I only cooked up enough pasta for a few days' worth and mixed only one serving (see above explanation.) Adjust based on how many people you're serving. This dish has enough protein to be a main dish.
1/2 box (6 oz) high-protein pasta (rotini are good for pasta salads, because they catch the sauce in their spirals)
Walnut oil (no more than 1 tablespoon per serving)
3-5 oz. grated Parmesan cheese
1 leek per serving
1. Wash the leeks well under cold running water (they're usually pretty dirty inside). Cut off the bottom (the root end) and discard. Chop the leeks in thin slices. Make sure you don't see any dirt in the slices. If you do see dirt in the slices, take the outer layer off, rinse the rest, and keep chopping. You may need to wash the entire leek again after you've started chopping it, because the dirt gets into all the crevices. Only cut the white and very light green parts of the leek. Discard the rest.
2. Put a bit of oil into a frying pan and saute the chopped leeks over medium heat for about 5 minutes, until they look wilted. Separate the rings as you're sauteeing.
3. Add some water (a little less than one tablespoon per leek), cover the pan, and turn the heat down to simmer. Simmer for 5 minutes or until the water is evaporated and the leeks look duly cooked.
4. Cook high-protein pasta according to directions on box.
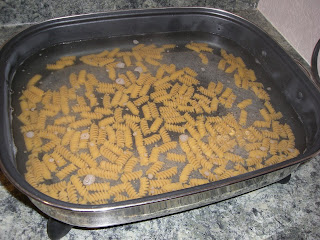
The rotini looked really funny in my electric skillet, so here's a picture:
5. Drain pasta and put in bowl. Toss with walnut oil. Add leeks and plenty of parmesan cheese. Salt and pepper to taste.
Note: This is even better with truffle oil, but since truffle oil is rather expensive, walnut oil will do just fine.
Dishes and Contentment
Yesterday I found myself wondering how much time I would save if I had a full-size oven and a dishwasher.
It started like this: I made a double batch of crackers (and I'd already doubled the recipe once, so it was really a fourfold batch of crackers, if that's the right word). It started with four cups of flour, and by the time it was mixed and rolled out thin, I had a lot of cracker dough, probably enough to cover half of my kitchen table (if I had wanted to do so). Now, I have two cookie sheets: one is 9" x 9", and the other is about 6" x 8". I only put one sheet in the oven at a time, so that the other one could cool and I could load it up again. Each batch bakes ten minutes or so, but I have to turn it around halfway through because my oven doesn't heat evenly, and some batches took longer than others. I think each cookie sheet went in the oven four times, so that's eight batches, and while I was eating lunch I was getting up every five minutes (if not more often). I felt like a jack-in-the-box. Finally I had to declare a moratorium on cracker-baking until my lunch was safely settled in my stomach.
In the evening it was time to wash the dishes. Lots of dishes. How can one person make so many dishes in three days? I only cooked two of those days, and all I made were crackers and dinner. Well, except for the celery I chopped, and then there were the plates I ate from, and even so I still don't know where they all came from! But they were dirty, and so I had to wash them, and so I did. :-)
Anyway, I almost started calculating the time I'd save. Then I remembered that it is my duty and my delight to be contented with what I have.
Besides, if I weren't in such a crazy little apartment, I wouldn't have anything to write about, would I?
It started like this: I made a double batch of crackers (and I'd already doubled the recipe once, so it was really a fourfold batch of crackers, if that's the right word). It started with four cups of flour, and by the time it was mixed and rolled out thin, I had a lot of cracker dough, probably enough to cover half of my kitchen table (if I had wanted to do so). Now, I have two cookie sheets: one is 9" x 9", and the other is about 6" x 8". I only put one sheet in the oven at a time, so that the other one could cool and I could load it up again. Each batch bakes ten minutes or so, but I have to turn it around halfway through because my oven doesn't heat evenly, and some batches took longer than others. I think each cookie sheet went in the oven four times, so that's eight batches, and while I was eating lunch I was getting up every five minutes (if not more often). I felt like a jack-in-the-box. Finally I had to declare a moratorium on cracker-baking until my lunch was safely settled in my stomach.
In the evening it was time to wash the dishes. Lots of dishes. How can one person make so many dishes in three days? I only cooked two of those days, and all I made were crackers and dinner. Well, except for the celery I chopped, and then there were the plates I ate from, and even so I still don't know where they all came from! But they were dirty, and so I had to wash them, and so I did. :-)
Anyway, I almost started calculating the time I'd save. Then I remembered that it is my duty and my delight to be contented with what I have.
I am content with what I haveSo I will not add up the time I would-have-could-have saved. I will focus on being content with what I have, because that is the best thing to do.
Little be it, or much
And Lord, contentment still I crave
Because Thou savest such.
(bonus points to anyone who knows the source of that quote)
Besides, if I weren't in such a crazy little apartment, I wouldn't have anything to write about, would I?
Monday, September 20, 2010
Electric Skillet Success!
My wonderful landlady replaced my hot plate with an electric skillet. It looks really nice and I think it'll be very versatile. I've never used an electric skillet before, so this is a learning experience for me. It helped that I found the manual online.
I'm planning a new dish to be made pretty soon. It's high-protein pasta with leeks, parmesan cheese, and walnut oil. I'll let you all know how it turns out.
In the meantime, I cooked the leeks tonight--the inaugural use of my electric skillet. Here are pictures:
I'm planning a new dish to be made pretty soon. It's high-protein pasta with leeks, parmesan cheese, and walnut oil. I'll let you all know how it turns out.
In the meantime, I cooked the leeks tonight--the inaugural use of my electric skillet. Here are pictures:
Friday, September 17, 2010
Alien Baker
Today I ordered a super-cool (or maybe super-weird) pair of safety goggles for... cooking. Yeah, cooking. I had a nasty episode over Labor Day weekend where I was making crackers and got some flour in my eye. It wouldn't come out no matter how many eyedrops I used, and by bedtime my eyes were red and irritated... not fun. Besides, eyedrops are really expensive ($10 per ounce, at least), and I wasted a lot of them trying to get that flour out of my eyes. The next day I had to go to the store and get better eyedrops (to the tune of $20 per ounce) to help my eyes recover.
I tried a pair of safety goggles from the dollar store, and established three things:
1) they work
2) I look really strange in them
and 3) you get what you pay for.
Then I went to the hardware store to see if I could find a nicer pair, but what lady in her right mind is going to go into a hardware store and ask if they have any goggles suitable for cooking? Yeah, right. The pair I picked out didn't fit at all. It was obviously made to fit a man's face, so it is going back to the store on Monday, because I want my $$ back.
That's why I turned to the Internet, because it's much easier to type a stupid question than it is to ask it out loud. Some nice customer service rep recommended this pair, and since the price is decent, I think it's worth a try.
For those who are wondering, no, I am not going to post a picture of me trying them on. I think they'll go nicely with my pinafore apron, thank you very much.
Has anyone else had this problem, or am I the only alien baker out there?
Wednesday, September 15, 2010
Cracker Perfection
I made another batch of the crackers tonight, and they turned out better than ever. They're really crisp and they taste wonderful! I updated the recipe to reflect the changes I made, and I added some pictures to show more of the process. If you're planning to make the crackers, be sure to check the updated recipe first.
Tuesday, September 14, 2010
Oat 'n Sesame Crackers
I don't buy grocery store crackers, because they're too high-priced for not enough food. (The only exceptions are store-brand saltines and oyster crackers, but they're all-white flour.) Lately I've been craving whole-wheat products, so I decided to start experimenting with crackers once again. It's been years since I made any crackers, and now I have such an array of ingredients--things like whole-wheat flour, oat flour, soy flour, wheat bran, and oat bran--that I know I can make really healthy crackers if I can just find the right recipe.
I started with one recipe just to try, but there was way too much butter in it, and the result ended up more like cookies than crackers. I didn't even bother to bake all of it. The rest of the dough went in the trash can. Then I found this recipe. It's my kind of recipe. It tells you what the essentials are and lists all kinds of variations (plus what will happen if you do them). So I took advantage of Labor Day weekend to start experimenting.
When I made my first batch, I decided I liked the crackers, but I wanted to make some changes. But when I finished eating the crackers I had made, I decided to make them the same way, with a dash of sugar and a little less oil. Of course, I forgot the sugar until the dough was already rolled out, but I did manage the "less oil" part, and the crackers were yummy. Those ones are gone too. Time to make more.
The second time around, I doubled the recipe, so now it makes about three cups of crackers. You can cut it in half if you like.
Oat 'n Sesame Crackers
2 c. oat flour (I'm thinking about replacing part of this with whole wheat flour)
1 scant t. salt
1 scant t. sugar, or to taste
Oat bran (optional)
2-3 t. toasted sesame seeds (look for a big jar in the Asian food section--don't buy these in the spice aisle of the grocery store, because the price is crazy and they're untoasted)
1 1/2 T. sesame oil
Water (at least 1/3 cup, but probably more)
The recipe I followed recommends using a food processor to mix the ingredients, so if you have one and know how to use it, get it out. I think the recipe works just fine mixed with a spoon and clean hands, so my directions assume you're doing it that way.
1. Mix together flour, salt, sesame seeds, sugar, and oat bran. Stir.
2. Add sesame oil and stir to mix. It'll look crumbly, as if you had cut shortening into it.
3. Add water gradually and stir. Keep adding and stirring until it forms into a compact ball, so that you could lift it out of the bowl with your hands. If it's sticky, add more flour. Mix the dough with your hands if you need to, making sure it's mixed thoroughly.
This is too sticky:
This is a compact ball:
4. Get out your rolling pin and flour it. Sprinkle your work surface with flour and divide the dough in two parts. Take the first part of dough and roll it out as thin as you can. This will make crisp crackers. If you want denser crackers, maybe a little chewy, don't roll the dough out as thick.
5. Get out a piece of parchment paper that fits your cookie sheet. Slide the parchment paper under the rectangle of dough, as below. (Note that parchment paper can be reused, at least for a few times.)
(If you have no parchment paper, you could probably use aluminum foil or a cookie sheet.)
6. Cut off edges of dough, if needed, so that it fits on your piece of parchment paper.
7. Ease the parchment paper onto the cookie sheet.
8. Now roll out the other piece of dough on its own piece of parchment paper.
9. Bake at 400 degrees for 10-15 min. Note that the thin edges may burn, depending on how you've rolled out your dough and how long you cook it. I like burnt edges, but if you don't, make sure you roll out your dough to a uniform thickness and don't overbake it.
10. Break crackers into pieces and enjoy.
Thursday, September 2, 2010
Tabouli, anyone?
I'm not sure how many batches of tabouli I've made this summer. Five or six, maybe? I've used more than 2 pounds of bulgur wheat and made plenty of trips to raid my neighbor's mint plant, and my poor parsley plant (which is still alive!) gets frequent haircuts. I don't know why I've been wanting so much tabouli, but I can't get enough of it.
If you want to try making tabouli, this is the time to do it. Pretty soon, tomatoes and cucumbers and parsley and mint will go out of season, which means paying more $$$ for lower-quality produce. Unless you live in the Southern Hemisphere, of course...
I made another trip to the store where I get my whole grains, and I got oat flour, kamut (which I'm excited to try), lots of oats, and vital wheat gluten (the easy way to make seitan). More recipes coming soon!
Subscribe to:
Posts (Atom)